Sales
The AR Invoices screen displays invoices in a list showing summary info including invoice date, age (in days), customer, invoice number, amount, and balance owing.
AR invoices are created automatically from posted sales order shipments, but can also be entered directly such as for credit notes or other times when a sales order, picking slip, shipment confirmation, and bill of lading are not required.
To add a new invoice: click the New button.
To edit an invoice: double-click the invoice. Or select the invoice and press Enter or click the Edit button.
To delete an invoice: select the invoice and click the Delete button.
You can select an invoice with the mouse or by the keyboard via the Page Up/Down and arrow keys. Or click the Find button, then enter the customer no. or select the customer name from the drop down list, and/or enter the invoice no. Selecting the customer only will find the 1st invoice for that customer. Selecting the invoice only will find the 1st invoice with that invoice number. Selecting customer and invoice no. will search on both.
The menu has options to
| • | display outstanding (unpaid) invoices only |
| • | filter the list by specifying selection criteria such as customer and currency |
| • | sort the list by invoice date (descending) or invoice no. |
| • | copy an invoice (all data except invoice no., date and period, which default as per a new invoice) |
| • | display the customer for a selected invoice |
| • | display payments for a selected invoice |
| • | refresh the data displayed to show changes entered by other users, etc. |
| • | print the list |
| • | print a selected invoice |
| • | print all unprinted invoices |
| • | export to Excel or comma delimited text |
| • | post printed invoices (see notes following) |
| • | reverse posted invoices |
Tip: To send e-mail (via your e-mail program), or display payments for an invoice, or display the customer: select the invoice, then right-click to display a pop-up menu. You can also print or reprint a selected invoice from the pop-up menu or from the main menu, but to print all unprinted invoices in one step you must use the main menu.
AR invoices are entered, printed, then posted. Prior to posting, they may be edited or deleted (unless created automatically from sales order shipments). To undo an invoice after posting, you must “reverse” it by clicking on the Reverse button or right clicking on the invoice and selecting "Reverse". You can then remove the invoice and credit if desired by entering a “dummy” AR payment for zero amount. Posting updates customer and inventory balances and creates general ledger journal vouchers to update the GL account totals and GL history.
To post invoices use menu Records | Post or choose the Post option when closing the invoices screen. Posting the JVs is a separate job because in a multi-user environment it is possible for this to conflict with other GL jobs such as printing financial statements. This minimizes the chance of the AR posting job being unavailable. JVs created by the AR system cannot be modified or deleted even prior to posting in the GL.
Note: Invoices must be printed prior to posting or have the “printed” checkbox manually checked (such as for hand-written invoices).
To print invoices use menu Print Selected Invoice or menu Print All Unprinted Invoices. Or right-click on an invoice and choose Print from the pop-up menu. To add a logo (for invoices, POs, quotes, etc.), default number of copies, and enter a company message to print on the invoices, use menu Print | Invoice Print Setup. The invoice prints your company name, address, phone number, and tax number (if desired) as specified on Your Company. You can add additional customer-specific text to be printed on the invoice by entering it on the customer screen, terms tab, in the “message”.
To view only “outstanding” (unpaid) invoices, toggle the outstanding option on the View menu.
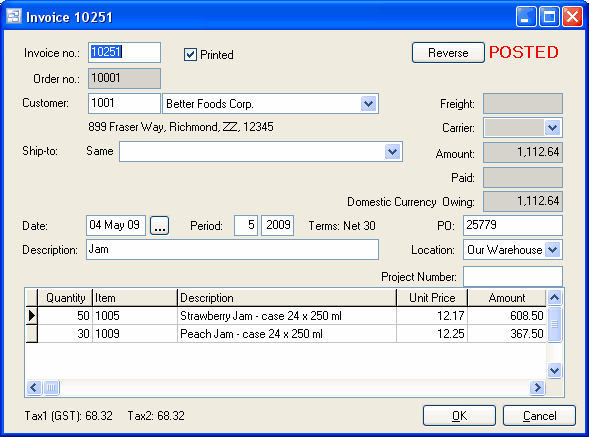
Invoice no.
When entering a new invoice, the program assigns a default invoice number which you can then change if desired.
Printed
If this was a hand-written invoice, or you don’t want to print it for some reason, then check this checkbox to tell the program that this invoice has already been printed. Otherwise leave it unchecked and the program will check it automatically after printing the invoice.
Customer
A pop-up screen displays if you type into the customer number, click, or by the keyboard shortcut Ctrl+Enter. On the Customer pop-up screen: you can select the customer by typing the customer number in the 1st entry box or by typing the name in the 2nd box, or by selecting the customer with the mouse or up/down arrow keys. Click on the selected customer or press Enter when the selected customer is highlighted. Or Esc to leave a previously entered customer unchanged.
Typing the customer number in the 1st entry box sorts the list by number and selects the first customer number matching the characters entered. Typing the customer name in the 2nd entry box sorts the list by name and selects the first customer name matching the characters entered.
On the Customer pop-up screen you can select Customer Type via the combobox at the right, so that only customers of the selected type show. To deselect a customer type and show all types, press Delete.
If this is a new customer, click the 3-dots button to display the customers screen, so the customer can be added.
Invoice Date
The invoice date defaults to today’s date.
Tip: You can use the + or - keys to increase or decrease the date, or click the 3-dots button to select the date from a calendar.
Period
This is the fiscal period and year of the invoice, the period to which the revenue should be applied. This defaults to the current calendar month, or the default period on Your Company if specified there. If your fiscal year doesn’t end in December or your fiscal periods are not calendar months, you should set the default period regularly to help prevent data entry errors. Note: The year is entered as 2 digits and displayed as 4.
Example: 11 2001 entered as 11 01
Purchase Order no.
Enter the customer’s purchase order number (if desired).
Description
Enter a description for this invoice (if desired). This prints on the invoice and on the AR statements.
Warehouse
This is the warehouse where the goods will be shipped from. The warehouse defaults to the 1st warehouse on file. Select the warehouse from the list if it should be changed. Note: Even if this invoice is for services only, the warehouse must be specified.
Tip: You can enter a few characters of the warehouse name, then use the down or up arrow keys if required.
Amount
The invoice amount is calculated by the program (rather than keyed) based on the item totals and any taxes.
Paid
This is the amount paid so far and is read-only. Payment info is entered via the AR Payments screen.
Owing
This is the amount owing and is read-only. It is the original invoice amount minus any payments and discount taken.
Items, Quantities, and Prices
Enter the quantity and unit price (in the customer’s currency) for each item. Items can be inventory items, services, or miscellaneous charges such as freight. The price defaults to the price on the prices table (converted to the customer’s currency if foreign) for this item, using the price list specified for the customer. You can type over this if desired. Also you can override the item description to be printed on the invoice (tab to the last field or maximize the invoice window). This allows you to have a generic description on the items table and enter a more specific description on the invoice. This is particularly suitable for labor.
Taxes are calculated automatically.
Tip: You can display a pop-up menu with options for New (line) and Delete (line) by right-clicking on the grid.
Item numbers or descriptions are not entered directly on the invoice screen, but instead selected on a pop-up screen which displays if you type into the item number or description column, or by clicking on the “3 dots” button in the column, double-clicking in the column, or by the keyboard shortcut Ctrl+Enter.
On the Item pop-up screen: you can select the item by typing the item number in the 1st entry box or by typing the description in the 2nd box, or by selecting the item with the mouse or up/down arrow keys. Click on the selected item or press Enter when the selected item is highlighted. Or Esc to leave a previously entered item unchanged.
Typing the item number in the 1st entry box sorts the list by number and selects the first item number matching the characters entered.
Typing the item description in the 2nd entry box sorts the list by description and selects the first item description matching the characters entered.
On the Item pop-up screen you can select Item Type via the combobox at the right, so that only items of the selected type show. To deselect an item type and show all types, press Delete.