Purchasing | Purchase Orders
The Purchase Orders screen displays orders in a list showing summary info including order date, requested receipt date, vendor, purchase order number, amount, and order status (on order, completed, or cancelled).
Purchase orders may be entered as "Quotes" (Purchasing - Purchase Quote) if you are not yet ready to order. Then when ready to order, you can convert the order to "On Order". Or purchase orders may be entered directly as "On Order".
Purchase orders have the vendor’s item no. and description, and may be a different unit of measure from your item. The vendor item table stores your item number and description for each vendor item, and the quantity per vendor’s item. example 12 if the vendor sells the item by the case of 12. You can specify alternate vendors and/or sizes for purchasing each of your items, view unit costs converted to your currency and unit of measure, and indicate your preference.
Purchase orders may be faxed (via your faxing software) or printed for sending to the vendor.
Receipts are entered against the previously entered purchase orders.
When a purchase order has been fully received, the order status is automatically changed to “completed”. You can also change the status yourself if there are to be no more receipts. Also you can mark specific items on the order as completed if no more is to be received.
To add a new order: click the New button.
To edit an order: double-click the order. Or select the order and press Enter or click the Edit button.
To delete an order: select the order and click the Delete button.
You can select an order with the mouse or by the keyboard via the Page Up/Down and arrow keys. Or click the Find button, then enter the vendor no. or select the vendor name from the drop down list, and/or enter the order no. Selecting the vendor only will find the 1st order for that vendor. Selecting the order only will find the 1st order with that order number. Selecting vendor and order no. will search on both.
The menu has options to
| • | display outstanding (on order) orders only |
| • | sort the list by order date (descending), requested receipt date, or order no. |
| • | copy a purchase order (all data except order no.and date, which default as per a new order) |
| • | display the vendor for a selected order |
| • | display receipts for a selected order |
| • | refresh the data displayed to show changes entered by other users, etc. |
| • | print the list |
| • | print a purchase order |
| • | print all unprinted purchase orders |
Tip: To send an e-mail (via your e-mail program), or display receipts for an order, or display the vendor: select the order, then right-click to display a pop-up menu. You can also print or reprint a purchase order (for a selected order) from the pop-up menu or from the main menu, but to print all unprinted purchase orders in one step you must use the main menu.
To print purchase orders use menu File | Print Selected Purchase Order or menu Print All Unprinted Purchase Orders. Or right-click on an order and choose Print Purchase Order from the pop-up menu.
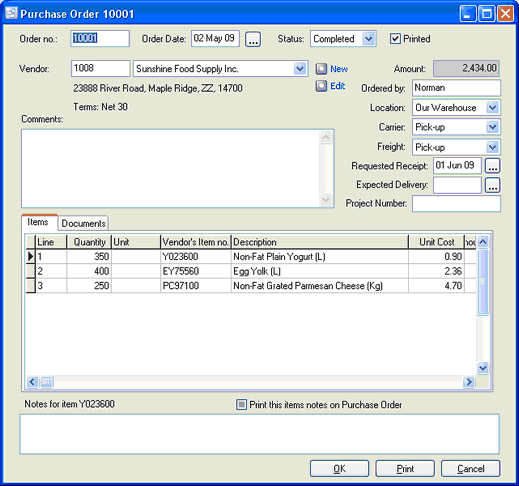
Order no.
When entering a new purchase order, the program assigns a default order number which you can then change if desired.
Purchase Order Printed
If the order has already been received, or was placed by phone, or for some other reason you don’t want a purchase order to print, then check this checkbox to tell the program that a purchase order has already been printed for this order. Otherwise leave it unchecked and the program will check it automatically after printing the purchase order.
Order Status
Select the appropriate order status from the list: On Order, Completed, or Cancelled. The order status defaults to On Order. When an order has been fully received, the order status is automatically changed to “completed”. You can also change the status yourself if there are to be no more receipts.
Vendor
Enter the vendor number or select the vendor from the list. Or leave blank and this will be entered automatically when you select a vendor item.
A pop-up screen displays if you type into the vendor number, click, or by the keyboard shortcut Ctrl+Enter. On the Vendor pop-up screen: you can select the vendor by typing the vendor number in the 1st entry box or by typing the name in the 2nd box, or by selecting the vendor with the mouse or up/down arrow keys. Click on the selected vendor or press Enter when the selected vendor is highlighted. Or Esc to leave a previously entered vendor unchanged.
Typing the vendor number in the 1st entry box sorts the list by number and selects the first vendor number matching the characters entered. Typing the vendor name in the 2nd entry box sorts the list by name and selects the first vendor name matching the characters entered.
On the Vendor pop-up screen you can select Vendor Type via the combobox at the right, so that only vendors of the selected type show. To deselect a vendor type and show all types, press Delete.
If this is a new vendor, click the 3-dots button to display the vendors screen, so the vendor can be added.
Amount
The order amount (excluding taxes) is calculated by the program (rather than keyed) based on the item totals.
Order Date
The order date defaults to today’s date.
Tip: You can use the + or - keys to increase or decrease the date, or click the 3-dots button to select the date from a calendar.
Requested Receipt Date
The requested receipt date defaults to today’s date.
Tip: You can use the + or - keys to increase or decrease the date, or click the 3-dots button to select the date from a calendar.
Expected Delivery Date
This is the date that you expect the item to be delivered from the Vendor. This can be different than that original requested receipt date and will help you keep track of when you inventory is actually due to arrive. It will also help you compare the actual receipt date against the original.
Ordered by
Enter the name of the person who placed this order or who it’s for (if desired).
Warehouse
Select the warehouse that will receive the items. The warehouse defaults to the 1st warehouse on file. Select the warehouse from the list if it should be changed. Note: Even if this order is for services only, the warehouse must be specified.
Tip: You can enter a few characters of the warehouse name, then use the down or up arrow keys if required.
Comments
Enter comments for this order (if desired), such as shipping instructions. This prints on the purchase order.
Carrier
This is the transportation company who will deliver the goods. If you want the order to be delivered by a specific carrier, you can enter it here. If you pick up your orders you can set up a carrier for that, such as “Pick-up”.
Tip: You can enter a few characters of the carrier name, then use the down or up arrow keys if required.
Freight Payment Method
Select the method for paying the freight charges. There are four default freight payment methods set up in Pilot ERP. However, you may define your own custom freight methods through the System Setup | Freight screen.
| • | Prepaid (vendor/seller pays shipping company) |
| • | Prepaid and Charge (vendor/seller pays shipping company, and bills you/consignee) |
| • | Collect (you/consignee pay shipping company) |
| • | Pick-up (you pick up, nobody pays) |
Tip: You can enter the 1st letter or use the down or up arrow keys to select.
Items, Quantity Ordered, and Costs
Note: these are vendor items with vendor’s item no. and description, and may be a different unit of measure from your item. The vendor item table stores your item number and description for each vendor item, and the quantity per vendor’s item. example 12 if the vendor sells the item by the case of 12.
Enter the quantity ordered and unit cost (in the vendor’s currency) for each vendor item. Vendor items can be inventory items, services, or miscellaneous charges such as freight. The cost defaults to the cost on the vendor item table, and you can type over this if desired. You can override the item description to be printed on the purchase order (tab, press Enter, or scroll to go this field or maximize the order window). This allows you to have a generic description on the vendor items table and enter a more specific description on the purchase order. You can override the costs and item descriptions later when entering the receipt(s).
Tip: You can display a pop-up menu with options for New (line) and Delete (line) by right-clicking on the grid.
Item numbers or descriptions are not entered directly on the order screen, but instead selected on a pop-up screen which displays if you type into the item number or description column, or by clicking on the “3 dots” button in the column, double-clicking in the column, or by the keyboard shortcut Ctrl+Enter.
On the Vendor Item pop-up screen: you can select the item by typing the item number in the 1st entry box or by typing the description in the 2nd box, or by selecting the item with the mouse or up/down arrow keys. Click on the selected item or press Enter when the selected item is highlighted. Or Esc to leave a previously entered item unchanged.
Typing the item number in the 1st entry box sorts the list by number and selects the first item number matching the characters entered.
Typing the item description in the 2nd entry box sorts the list by description and selects the first item description matching the characters entered.
On the Vendor Item pop-up screen you can select Item Type via the combobox at the right, so that only items of the selected type show. To deselect an item type and show all types, press Delete.
Only vendor items for the selected vendor are shown. However if no vendor has been selected yet, then all items show, in which case selecting an item also selects the vendor. This is useful if you don’t know who the vendor is for the item.
Quantity Received and Quantity on BackOrder
Any quantity already received (from posted receipt(s)) and resulting quantity on backorder, if any, are displayed. (Tab, press Enter, or scroll to see these fields or maximize the order window).
Completed (override)
To mark an order item as being no longer on order (say if partially received and you have notified the vendor that you don’t want it backordered), you can mark it as completed by entering y, spacebar, or double-click. To reset to “not completed” enter n, spacebar, or double-click.