Purchasing | Vendor Items
The Vendor Items screen displays vendor items in a list showing vendor, vendor’s item no., description, preference, cost in vendor’s currency, cost date, quantity of our item per vendor’s item, our item number and description, and cost converted to domestic currency and our unit of measure.
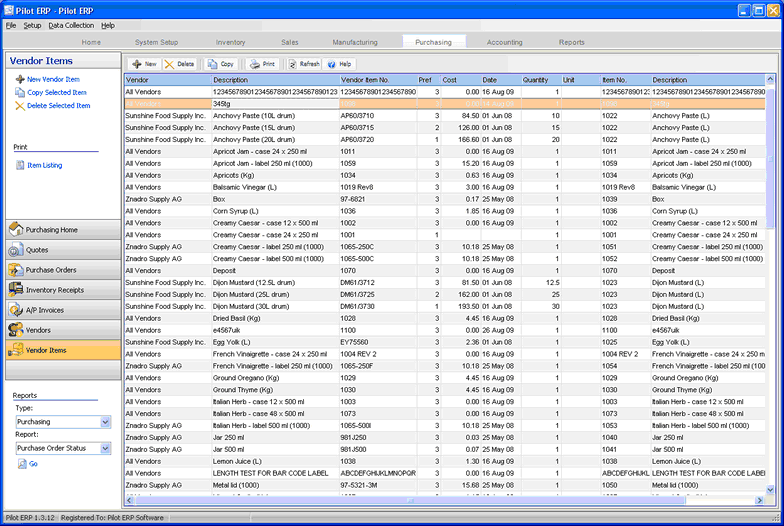
Purchase orders have the vendor’s item no. and description, and may be a different unit of measure from your item. The Vendor Item table stores your item number and description for each vendor item, and the quantity of your item per vendor’s item. example 12 if the vendor sells the item by the case of 12. You can specify alternate vendors and/or sizes for purchasing each of your items, view unit costs converted to your currency and unit of measure, and indicate your preference.
To add a new vendor item: click the New button. Or menu Records | New.
To edit a vendor item: double-click the item. Or select the item and press Enter or click the Edit button. Or menu Records | Edit.
To delete a vendor item: select the item and click the Delete button. Or menu Records | Delete.
You can select a vendor item with the mouse or by the keyboard via the Page Up/Down and arrow keys. Or click the Find button, then enter the vendor’s item no. or select the vendor’s item description from the drop down list. Tip: You can enter the 1st letters of the vendor’s item description then press the down arrow. Also you can filter the list to show only vendor items for a selected item and/or vendor.
The menu has options to
| • | filter the list by specifying selection criteria such as vendor, our item, or “suspended” |
| • | sort the list by vendor’s item no., description, or preference |
| • | copy a vendor item (all data except vendor’s item no.) |
| • | display the vendor for a selected vendor item |
| • | display the item for a selected vendor item |
| • | display inventory totals for a selected item |
| • | display inventory history (transactions) for a selected item |
| • | refresh the data displayed to show changes entered by other users, etc. |
| • | print the list |
Tip: To phone the vendor, or send e-mail (via your e-mail program), or display inventory totals or history for an item: select the vendor item, then right-click to display a pop-up menu.
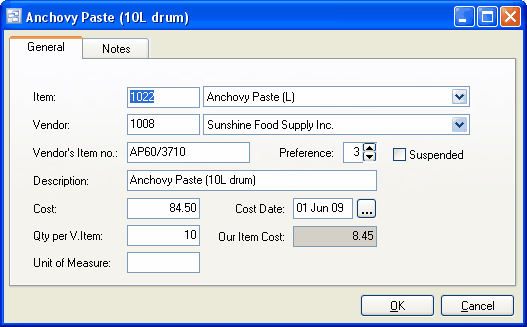
Item
A pop-up screen displays if you type into the item number, click, or by the keyboard shortcut Ctrl+Enter. On the Item pop-up screen: you can select the item by typing the item number in the 1st entry box or by typing the description in the 2nd box, or by selecting the item with the mouse or up/down arrow keys. Click on the selected item or press Enter when the selected item is highlighted. Or Esc to leave a previously entered item unchanged.
Typing the item number in the 1st entry box sorts the list by number and selects the first item number matching the characters entered. Typing the item description in the 2nd entry box sorts the list by description and selects the first item description matching the characters entered.
On the Item pop-up screen you can select Item Type via the combobox at the right, so that only items of the selected type show. To deselect an item type and show all types, press Delete.
If this is a new item, click the 3-dots button to display the items screen, so the item can be added.
Vendor
A pop-up screen displays if you type into the vendor number, click, or by the keyboard shortcut Ctrl+Enter. On the Vendor pop-up screen: you can select the vendor by typing the vendor number in the 1st entry box or by typing the name in the 2nd box, or by selecting the vendor with the mouse or up/down arrow keys. Click on the selected vendor or press Enter when the selected vendor is highlighted. Or Esc to leave a previously entered vendor unchanged.
Typing the vendor number in the 1st entry box sorts the list by number and selects the first vendor number matching the characters entered. Typing the vendor name in the 2nd entry box sorts the list by name and selects the first vendor name matching the characters entered.
On the Vendor pop-up screen you can select Vendor Type via the combobox at the right, so that only vendors of the selected type show. To deselect a vendor type and show all types, press Delete.
If this is a new vendor, click the 3-dots button to display the vendors screen, so the vendor can be added.
Vendor’s Item no.
Enter the vendor’s item no. This will print on purchase orders, rather than our item no.
Description
The default description for this vendor item. You can override this when entering purchase orders or receipts.
Preference
Optionally enter a number to indicate preferred vendor and/or size (item). 1 = Highest. Default is 3.
Tip: You can use the + or - keys to increase or decrease. Or use the up and down arrows.
Suspended
Check here to prevent further purchase orders from being entered for this vendor item.
Cost of Vendor’s Item
Enter the cost of the vendor’s item in the vendor’s currency. This is the default cost when entering purchase orders. You can override this on the purchase order or on the receipt(s).
Cost Date
The date when the vendor’s cost was last obtained. This defaults to today’s date anytime the cost is changed.
Tip: You can use the + or - keys to increase or decrease the date, or click the 3-dots button to select the date from a calendar.
Quantity per Vendor’s Item
Conversion factor: quantity of our item per vendor’s item.
Example 1: If you sell bottles of pop and purchase them in cases of 12, then enter 12.
Example 2: If you sell bottles and purchase by the bottle, enter 1.
Cost of Our Item
Our item cost is calculated based on the vendor's item cost, currency exchange rate, and quantity of our item per vendor's item. To compare costs for multiple vendor’s and/or sizes, you can filter the list to show only vendor items for a selected item. You can then sort the list by Preference if desired.
Notes
Enter any notes you wish to record here.